Labels

Thursday, October 22, 2020

Gribeauval 12 Pounder Cannon (3D Art Week 08)

 Boot camp is over, and our first assignment is to make a cannon with very detailed surfaces and materials. Nick gave us a cannon tutorial he made, but allowed us to push the cannon as far as we wish so long as we complete it. Given that this is a learning exercise, I decided not to go too wild with it and instead base my research on a realistic design. 

I'm a big fan of the Napoleonic era and the artillery used during that time period was iconic for its lightweight designs that didn't sacrifice firepower. The French used a new Gribeauval system for cannon classification; this standardized the cannons in an efficient way and helped the French armies achieve the victories they did. 


Here are some references of a 12 pounder cannon. I intend on reproducing it closely while adding some flair and details to give it character.


I also intend on making the piece part of a diorama set in the French countryside, and this will involve vegetation and miscellaneous items. However, for this week I decided to focus more on the cannon itself than the peripheral geometry. As such, I began modeling just the 12 pounder. 


I modeled everything in pieces, which allowed me greater freedom when modeling and decorating. I snapped axes to the center point and around the axles to pose the cannon once the overall body and details were done to avoid modeling at an awkward angle. 

Finally, this is the end result in Unreal 4! Next week I'll add more detail and surrounding objects!

Thursday, October 15, 2020

The Creation of Kong (Common Art Week 07)

 Our final assignment before we are free of boot camp! Nick was very kind as to allow us almost no parameters or restrictions- anything is fair game and we're able to use anything and everything we've learned in Common art. 

I rather enjoyed the freedom nature of the assignment, and as such I had a wide gamut of choice. I wanted to once again put my own spin on a piece of recognizable art, so instead of creating my own concept [t with limited time, I chose the Creation of Adam by Michelangelo.

Easily the most fun art of this week's assignment was posing all these animals and Hugh to get them in the right place. Upon rendering it, I took it to Photoshop where I came up with a a post processing to-do list. 

This is the final piece! I hope you like it!

Monday, October 12, 2020

Portable ATM, Part 3 (3D Art Week 07)

Our final week with this crate has finally come! 


Before showing you guys the end result, let's take a moment to review the reference once again. I found this on Pinterest and it seemed like a good, complex shape to mess around with, so it became the focus of the project!


For this week, after modeling and baking normal maps, we were tasked with texturing the crate. Substance Painter was an absolute joy to use: the controls were intuitive and a popup appeared with shortcut reminders, so getting around was easy. The tools were powerful and making full textures was no issue at all!


Here is the final render for these crates. Quite a lot went into the post-processing, from a dirt mask colored the same tint as the interior lights of the crates to some light chromatic aberrations and fog in the background to sap light and definition away from any possible distractions. 

Unreal 4's sequencer is pretty robust and allowed for a wide range of effects on any operable cameras. I opted for a simple fade in and out, but the possibilities are very wide for displaying work in a professional capacity. I hope you like the final product, it's been a productive three weeks and I enjoyed sharing them with you!

Thursday, October 8, 2020

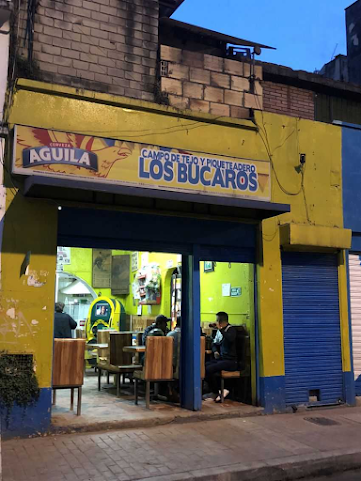
Medellin Street Corner

Medellin is a city in the country of Colombia, the place where I was born.  I actually come from Bogota, which means I have to have a friendly rivalry with anybody from Antioquia. However, not even the most diehard patriot will turn a blind eye to the beauty of Medellin's city, and of the tenacity that her people have demonstrated in revitalizing the slums into the tourist attractions they are today. As such, this week's assignment was my perfect opportunity to render tribute to this city and just have fun exploring Colombia again.


We were tasked with making multiple point perspective shots in a city, which led me to immediately think of Medellin's Comuna 13- a neighborhood known for being the most dangerous place in the entire city. Over time, a citizen outreach and revitalization program turned the place around and it's become something of an art capital in Antioquia. The buildings there are all squat and boxy, which is perfect for showing off perspective. Another thing that I found fun was that Medellin, and Colombia as a whole, is very hilly and as such our cities have a sort of verticality that gives them a distinct personality, and for the sake of this assignment it gives me an opportunity to make a visually appealing piece. 


Planning out the piece took me a while. I grabbed as many reference pictures as I could, and sifted through them to get the look and feel of these buildings down. I wasn't going to be able to be faithful to the architecture, but I wanted to capture at least some semblance of the style.


A chaotic street corner, packed with a mixture of dwellings and stores, seemed to me like the best route to take this. This seemed to me to display the quintessential quality of a city- everything is at your fingertips, everything is stacked and mushed together, and buildings go tall instead of wide. 


Once I had a basic layout in mind, beginning in Maya was very easy. Having an outline planned out made blocking out the buildings simple, and I was able to focus on things like scale, building diversity, and how well everything would fit with each other.

Once everything was blocked out, I began to model each building separate from the layout. The intent was to have the building in a position to make modeling and assembly easy, and then rotate and translate them as they needed when that step was done. 

I developed a modular asset system where I would take a building and outfit it with any decoration and trimming it needed as well as model it to better suit the environment. 


Finally, I began to render out the passes. 1 point perspective, 2 point perspective, and 3 point. Our final task was to take one of these and push it farther, so I chose the 2 point perspective and took it to photoshop. 


This was the final step in the little corner's journey to this blog. I chose a film noir look for this shot because to me, these buildings feel old and bring me nostalgic feelings. Seeing them again through film grain as if it were a black and white picture was evocative to me, and I hope pleasing to you. Thank you for reading!


Monday, October 5, 2020

Portable ATM, Part 2 (3D Art Week 06)

This week our assignment took us back to our lovely crates, this time with the intent to drive up the detail and make them look spectacular! However, we'd have a special surprised saved up for them at the end.

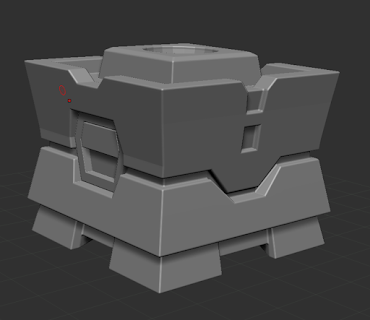
The first thing to do was, of course, to get the crate mesh into Zbrush to begin messing with it. After making my crate a Dynamesh, I worked around it adding whatever detail I could, from rivet holes to scuff marks and weathering on the edges. 


Next, I took the incredibly high poly model and decimated it. For this asset, I chose to leave 20% of the initial polygons, and exported it out. Upon doing that, I had all the files I needed to take the model to the next level: baking normal maps.


First, I would need a workable set of UV's. Instead of UVing the absolute topological mess that is the high poly model, I UV'd the low poly version I started with. The UV's were crisp and manageable, something that wouldn't have been possible with the Zbrush export- at least, not without spending far more time than I had on it. 


Finally, we take our clean, UVd mesh into Substance Painter and bring in the high poly version as a bake! Within minutes, the low poly model has a fantastic amount of detail, and the poly count is spared a couple thousand polygons that the engine does not have to render anymore.


Here is a closer look at the crate at this stage. Next week, I'll texture it!


Thursday, October 1, 2020

Revenge of the Hugh (Common Art Week 05)

 The assignment this week was to take a composition style (spiral, rule of thirds, circular) and assemble a scene with some assets from a pack. We were free to use our own models in addition, and that is what got me thinking. I had previously been tasked with making a very simple rig for a character in my tech art class, so I used a Hugh Neutron model for that. Now that I had a rigged model with textures, I figured why not use him for this assignment as well? 

As you all know too well (if you've been following this blog for a bit!), I'm a massive Star Wars fan. As a kid, one of my favorite movies was Revenge of the Sith; I remember getting emotional over Anakin and Obi Wan's battle and feeling a sense of catharsis as the tragedy played out before me. Of course, now that I'm more knowledgeable thanks to my experience in the industry I can say that it's a flawed movie, but still a very fun adventure and one of my most watched to this day. 

As such, I wanted to dedicate this assignment to Episode 3 of 6. 

My process began simply enough- grabbing a reference image of what I was going to do. I looked up Drew Struzan's work, having been a fan of his posters already, and spotted his Episode 3 poster. It was a good example of triangular composition, so all that was left was to begin working. 

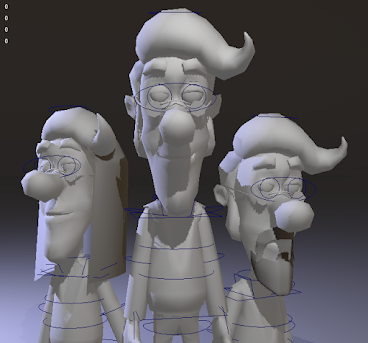
Step one was to emulate the poster with my Hugh rig. Each character would become Hugh. This was easily the most entertaining part, as it was quite fun to pose Hugh around and make him act like multiple characters. 


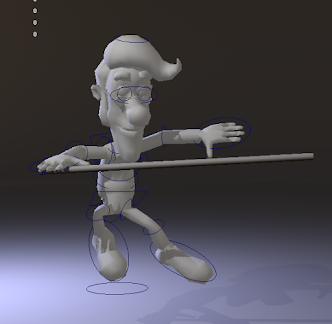
Here are some screenshots of the posing process. I made use of some props to make sure the motion was captured well enough to convey meaning, and made some accessories so we can more easily tell him apart from the others.


The next step was to generate lighting and render out each piece of the poster separately. I could have done it all at once, but by doing one piece at a time I was able to layer them in Photoshop without a messy selection and separating segment. Here are some renders from this period.

Finally, I grabbed all the renders I'd done and made a composite work in Photoshop. After a lengthy postprocessing session and a lot of fussing over lighting, I ended up with this result! I'm quite satisfied with it, so I hope you all enjoyed it as much as I did when making it!

Saint Anatoles Cathedral (3D Art Week 03)