I'll be the first to admit that I've never shot, much less owned, a Nerf gun before. This assignment was a little difficult because of that, so I used Nick's Maveric for reference and took a good look at his shots to make sure I understood what I was getting into.
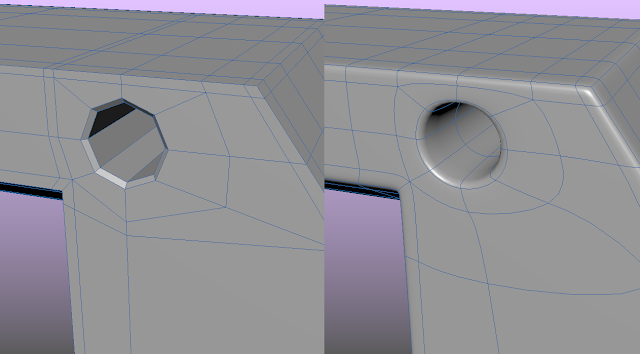
For this week, I was able to complete what I call the "chassis" of the gun, which might be more accurately described as the frame or something. It wasn't an extremely complex shape but the care and attention that is required of a hero asset like this means that the edge flow and fencing has to be done just right. For example, here's a shot of one of the corner holes in the frame.
The topology on the rightmost part of that hole isn't necessarily able to support the hole's shape that well, so even though it has a circular look, the shape isn't being held properly and has some stretching. Since we want this gun to look like a machined part, it's best to fix this kind of imperfection before it shows up on a render.
To that end, I added some supporting edge loops closer to the actual hole so it could retain its shape better. When I smoothed it out, the circle held! The rest of the model was an exercise in this kind of thing: smooth preview, notice what's wrong or what shapes aren't precise, and figure out how to manipulate the topology. It's a lengthy, time consuming process, but ultimately the end result is a clean, well supported piece of geometry that won't cause any weird shapes or pinching to form. At the end of the day we want to fool the viewer into thinking this is a real picture, or at least a very well done rendition, so going the extra mile helps a lot!
Here is my final model in unsmoothed and smoothed view. Next week I'll tackle the bullet chamber and the handle!


No comments:
Post a Comment